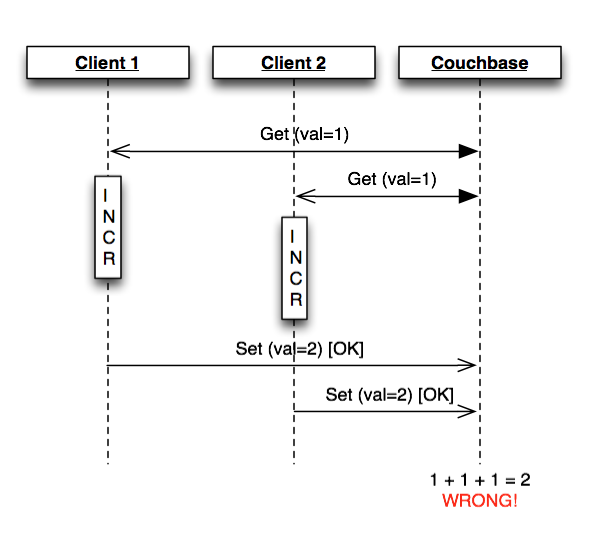
So you want to run your Rails site such that it always uses HTTPS, and you want all HTTP URLs to redirect to their HTTPS counterparts? Typically you use config.force_ssl = true in your initializer, or you use force_ssl in your controllers. For various reasons having to do with late-binding configuration, I have typically not been able to use the config.force_ssl method. This means the easiest way to force the whole site to use HTTPS has been to use force_ssl on the base ApplicationController, like this:
HTTP Strict Transport Security (HSTS) is a recent specification aimed at stopping a certain type of man-in-the-middle attack known as SSL Stripping. By default, when a user types “example.com” into their browser, the browser prefixes that with “http://”. A man-in-the-middle attack can hijack the connection before the server redirect to HTTPS gets back to the browser, spoofing the site and potentially luring the user into providing sensitive data to the attacker.
You can read a nice explanation of this attack, and how HSTS helps to prevent it here.
The wikipedia page on HSTS provides some examples on how to enable this in your web server (apache, nginx, etc). However, when running behind an ELB in Amazon Web Services, where you cannot configure this at the reverse proxy, you may wish to do this in your application.
Here is how to achieve that in Ruby on Rails, using a before_filter in your base ApplicationController:
We had a pretty big traffic surge for our product, VERA, last week after being featured on ABC World News with Diane Sawyer and Nightline, and we continue to see some decent sustained load since then.
This is, of course, great news for the company, but it also sparks some interesting discussions about metrics. After a few conversations with some colleagues of mine about statistics, metrics, and analytics, I thought I’d dig up some good articles to summarize some of the key Lean Startup principles surrounding metrics and data-driven decision-making for those who haven’t had the pleasure of reading Eric Reis’s book Lean Startup. That turned into a writeup about what metrics we are reporting internally, and why we focus on Actionable Metrics over Vanity Metrics. I figured I’d share some of that as a blog post here as well.
My goal is to provide a little background on Actionable Metrics and how they differ from Vanity Metrics. Understanding this is a central theme of the book Lean Startup, by Eric Reis, and the writings and teachings of a number of other prominent startup/entrepreneur/lean proponents such as Steve Blank, Dave McClure, and Ash Maurya. Fred Wilson of Union Square Ventures, has been quoted saying, “one of our firm’s favorite measurements is the cohort analysis”.
This post illustrates how you can have a single script on your workstation (yes, of course, it’s a Mac) that provisions a new Windows EC2 instance and bootstraps it using Opscode Chef – written from the point of view of someone who is used to doing this all the time with ease for Linux instances using the knife-ec2 gem. I’ll assume the reader:
has a basic working knowledge of Opscode Chef
is using Hosted Chef
already has a working chef-repo workstation with knife configured
already has (or can figure out) knife-ec2 installed and configured with AWS API credentials
is on their own for creating actual cookbooks and roles to configure their Windows instances
This is fairly easy to do with Linux instances. Using knife ec2 server create and a bunch of parameters, a single command provisions a new Linux instance in EC2, waits for it to come up, connects to it over SSH using the specified key pair, installs chef-client, and bootstraps the node using the specified run_list. Done.
However, things are not so simple for Windows Server instances.
I work in a team that is distributed around the country, where everyone works from their home offices. Sounds great, doesn’t it? Well, it’s not for everyone. First, you have to be seriously self-motivated. Personally, I get more done at home than I ever have at an office, because I get to choose when to be distracted and I’m good at staying focused. For some people, choosing when to be distracted is a curse. They choose to be distracted all the time. Facebook, twitter, bathroom, kitchen, twitter, kids, etc.
Still, some of those home distractions can plague even the most focused of us. One of the keys I’ve found to succesfully working from home is to have a dedicated work space. I am lucky enough to have an extra room to use as an office, and the family knows that when I’m in there, “Daddy’s at work”.
Every time I want to combine two git repositories into a new high-level repository, I have to re-figure it out. I decided this time to write it down. Maybe someone else will find this useful too.
Here is my scenario: I have two repositories. I want to make a new empty repository and move the other two into it as subdirectories. I also want to preserve all the commit history of the original repositories.
Here are the steps involved for the first repository:
Clone the first source repository
Remove its origin ref so you dont’ accidentally push any screwups
Make a subdir in that source repo named the same as the repo
Move all the top-level files into that directory
Commit that move.
Create (or clone) your desination repository.
Add a remote ref to it that points to the file location of your source repo clone.
Pull from that ref
Remove that remote ref.
You can now delete the clone of the source repository you, so you don’t really keep those file moves around in the original source if you don’t want to.
# ...First create a new empty repository on github named 'simpsons'...# Clone all the repos to work with$ cd ~/src
$ git clone git@github.com:scottwb/homer.git
$ git clone git@github.com:scottwb/bart.git
$ git clone git@github.com:scottwb/simpsons.git
# Copy over homer to simpsons$ cd homer
$ git remote rm origin
$ mkdir homer
$ git mv *.* homer/.
$ git commit -m "Prepare homer to merge into simpsons"$ cd ../simpsons
$ git remote add homer ~/src/homer
$ git pull homer master
$ git remote rm homer
$ cd ..
$ rm -rf homer
# Copy over bart to simpsons$ cd bart
$ git remote rm origin
$ mkdir bart
$ git mv *.* bart/.
$ git commit -m "Prepare bart to merge into simpsons"$ cd ../simpsons
$ git remote add bart ~/src/bart
$ git pull bart master
$ git remote rm bart
$ cd ..
$ rm -rf bart
# Push simpsons back upstream to github$ cd simpsons
$ git push
Bonus Points: Only Moving a Sub-Directory
What if you only want to move a subdirectory of the original source repository into the destination repository? All you need to do is filter out what you copy into that new sub-directory you create in step 4, and make sure everything else gets removed from that source repository. (Don’t worry - remember, you’re just working with a local working copy of that source repo, that you’re going top discard after this operation. You won’t harm anything irreversibly here.)
One way to peform that filtering is by using the git filter-branch command. For example, to only copy the pranks subdir from the bart repo, just before step 4, you would do something like this:
Sometimes in your Ruby on Rails models, you want to override the attribute accessors to do additional processing on the values on their way in and out of the data storage layer. Custom serialization is a common use of this.
For example, when using ActiveRecord for your Rails models, you can provide custom attribute accessors, say to serialize a Hash to JSON, using the read_attribute and write_attribute methods like this:
12345678910
# Assume a text column named 'stuff'classUser<ActiveRecord::BasedefstuffJSON.parse(read_attribute(:stuff))enddefstuff=(new_val)write_attribute(:stuff,new_val.json)endend
With this, you can assign a Hash to the stuff attribute of User, and when you access it via User#stuff, you get a Hash back. All the while, it’s read and written to and from the database as a JSON string.
Doing it with Ripple on top of Riak
Ripple is the Ruby modeling layer for the distributed NoSQL store, Riak. It tries very hard to provide a lot of the same interfaces as ActiveRecord. However, this is one of the areas it diverges: Ripple::Document objects do not support the read_attribute and write_attribute methods.
Instead, they implement the [] and []= methods. Translating the code above to work with Ripple is pretty easy:
Using this tactic, you can easily add some memoization so that your getter doesn’t need to parse the JSON text on every access. To do this, we’ll use an instance variable as a cache that we’ll invalidate in the setter, like so:
I like jQuery Mobile’s page loading spinner. When you transition between pages it displays a nice subtle spinner while the page loads, only if the page load takes more than a configured number of milliseconds.
So, I wanted to use their page-loading spinner for in-page wait times in my app. The user clicks something, I do some AJAX stuff and show them a nice spinner with a message telling them what’s going on until the results come back. jQuery Mobile has javascript functions for this called $.mobile.showPageLoadingMsg and $.hidePageLoadingMsg. The problem is, you can either show a spinner only, or a text-message only. You can’t show both a spinner and a text message, even though they clearly support it. Well, you can do that if you have the global setting $.mobile.loadingMessageTextVisible = true, but then you get a text with your normal page-load spinners.
Using Rails 3.2 (or 3.1 for that matter), you typically have CoffeeScript (and a javascript engine like therubyracer/V8) installed as gems - probably via Bundler from your Gemfile, possibly in a per-project RVM gemset.
It doesn’t seem that this type of setup includes direct access to the coffee command-line compiler. Instead the coffee-script gem uses calls directly to the compiler. Sometimes I’d just like to compile one of the CoffeeScript files in my Rails app just to look at the javascript, or maybe to export it somewhere that I’m not using CoffeeScript.
To do this, I’ve made a simple Rake task. Just drop this into lib/tasks/coffee.rake in your Rails project:
When using jQuery Mobile, if you try to reload the current page from javascript using the usual tactics of assigning window.location.href, you might notice some unsightly artifacts and page blinking. This is particularly noticeable on iOS Mobile Safari (mainly on iPhone), because the reload also causes the address bar to slide down and back up.
Below is function I made to refresh the current page successfully with no visible artifacts: no blinking, no address bar showing, transitions: